목차
Lifecycle Hooks은 Vue에서 아주 중요한 개념 이다.
감히 내가 생각컨데 Lifecycle Hooks를 알고 코드를 작성하는 것과 모르고 코드를 작성하는 것은 큰 차이가 있다.
Lifecycle Hooks을 이해하지 않아도 크게 문제 되지 않지만 규모가 커지면서 component간 통신이 다양해 질 수록 Lifecycle Hooks의 이해도가 절실해 진다.
(대충 알고 코드 짜다가 분명 "이 왜 안돼노? 아.. 맞는데!" 이런 말 나오면서 칼퇴근은 빠이~ 하게 됨)
Lifecycle Hooks을 공부하다 보면 Dom, Virtual Dom 같은 개념이 출몰? 하는데 사뿐히 무시해 버렸다.
Dom은 개발 시 수없이 듣고 찾아봐서 어느정도 감은 잡히지만 Virtual Dom은 여전히 감이 잡히지 않는다.
정확히 말하면 Virtual Dom을 이용해 Dom을 활용하는 방법이 너무 추상적으로 느껴져 확~ 와닿지가 않는다.
따라서,
아직 정확히 이해하지 않았지만, 지금까지 이해한 내용을 정리 해본다.
Lifecycle Hooks 개념
Lifecycle Hooks이란, 하나의 component가 생성, 수정, 소멸되는 일련의 과정(생명주기)을 말한다.
단순하게 생각하면, 하나의 HTML페이지가 브라우저에 출력되고 닫히는 과정이다.
일련의 과정에는 대표적으로 아래의 경우가 있다.
- 데이터 설정이 필요한 경우
- 템플릿을 컴파일 하는 경우
- 컴포넌트를 Dom에 마운트하는 경우
- 데이터가 변경되어 Dom를 업데이트하는 경우
Lifecycle Hooks 개념 예제
// component main page 컴포넌트
<template>
	<h1>Component Main Page</h1>
	<LifeComponent v-if="isShow"></LifeComponent>
	<button @click="show">버튼</button>
</template>

<script>
import LifeComponent from './src/components/LifeComponent';

export default {
	components: {
		LifeComponent,
	},
	data(){
		return{
			isShow: false,
		}
	},
	methods: {
		show(){
			this.isShow = !this.isShow;
		}
	},
}
</script>- 우선 Component Main Page 컴포넌트가 화면에 그려진다.
- LifeComponent는 v-if속성으로 화면에 출력 되지 않는다.
- 사용자가 버튼을 클릭 하면 LifeComponent가 Component Main Page컴포넌트에 출력된다.
- 이때, LifeComponent가 화면에 출력되는 과정에서 LifeComponent는 Lifecycle Hooks의 과정(생성, 수정, 소멸)을 거친다.
당연하게도 Component Main Page component도 화면에 출력되기 까지 Lifecycle Hooks의 과정을 거친다.
쉽게 이해하기 위해 LifeComponent관점에서만 기술했다.
Lifecycle Hooks 다이어그램
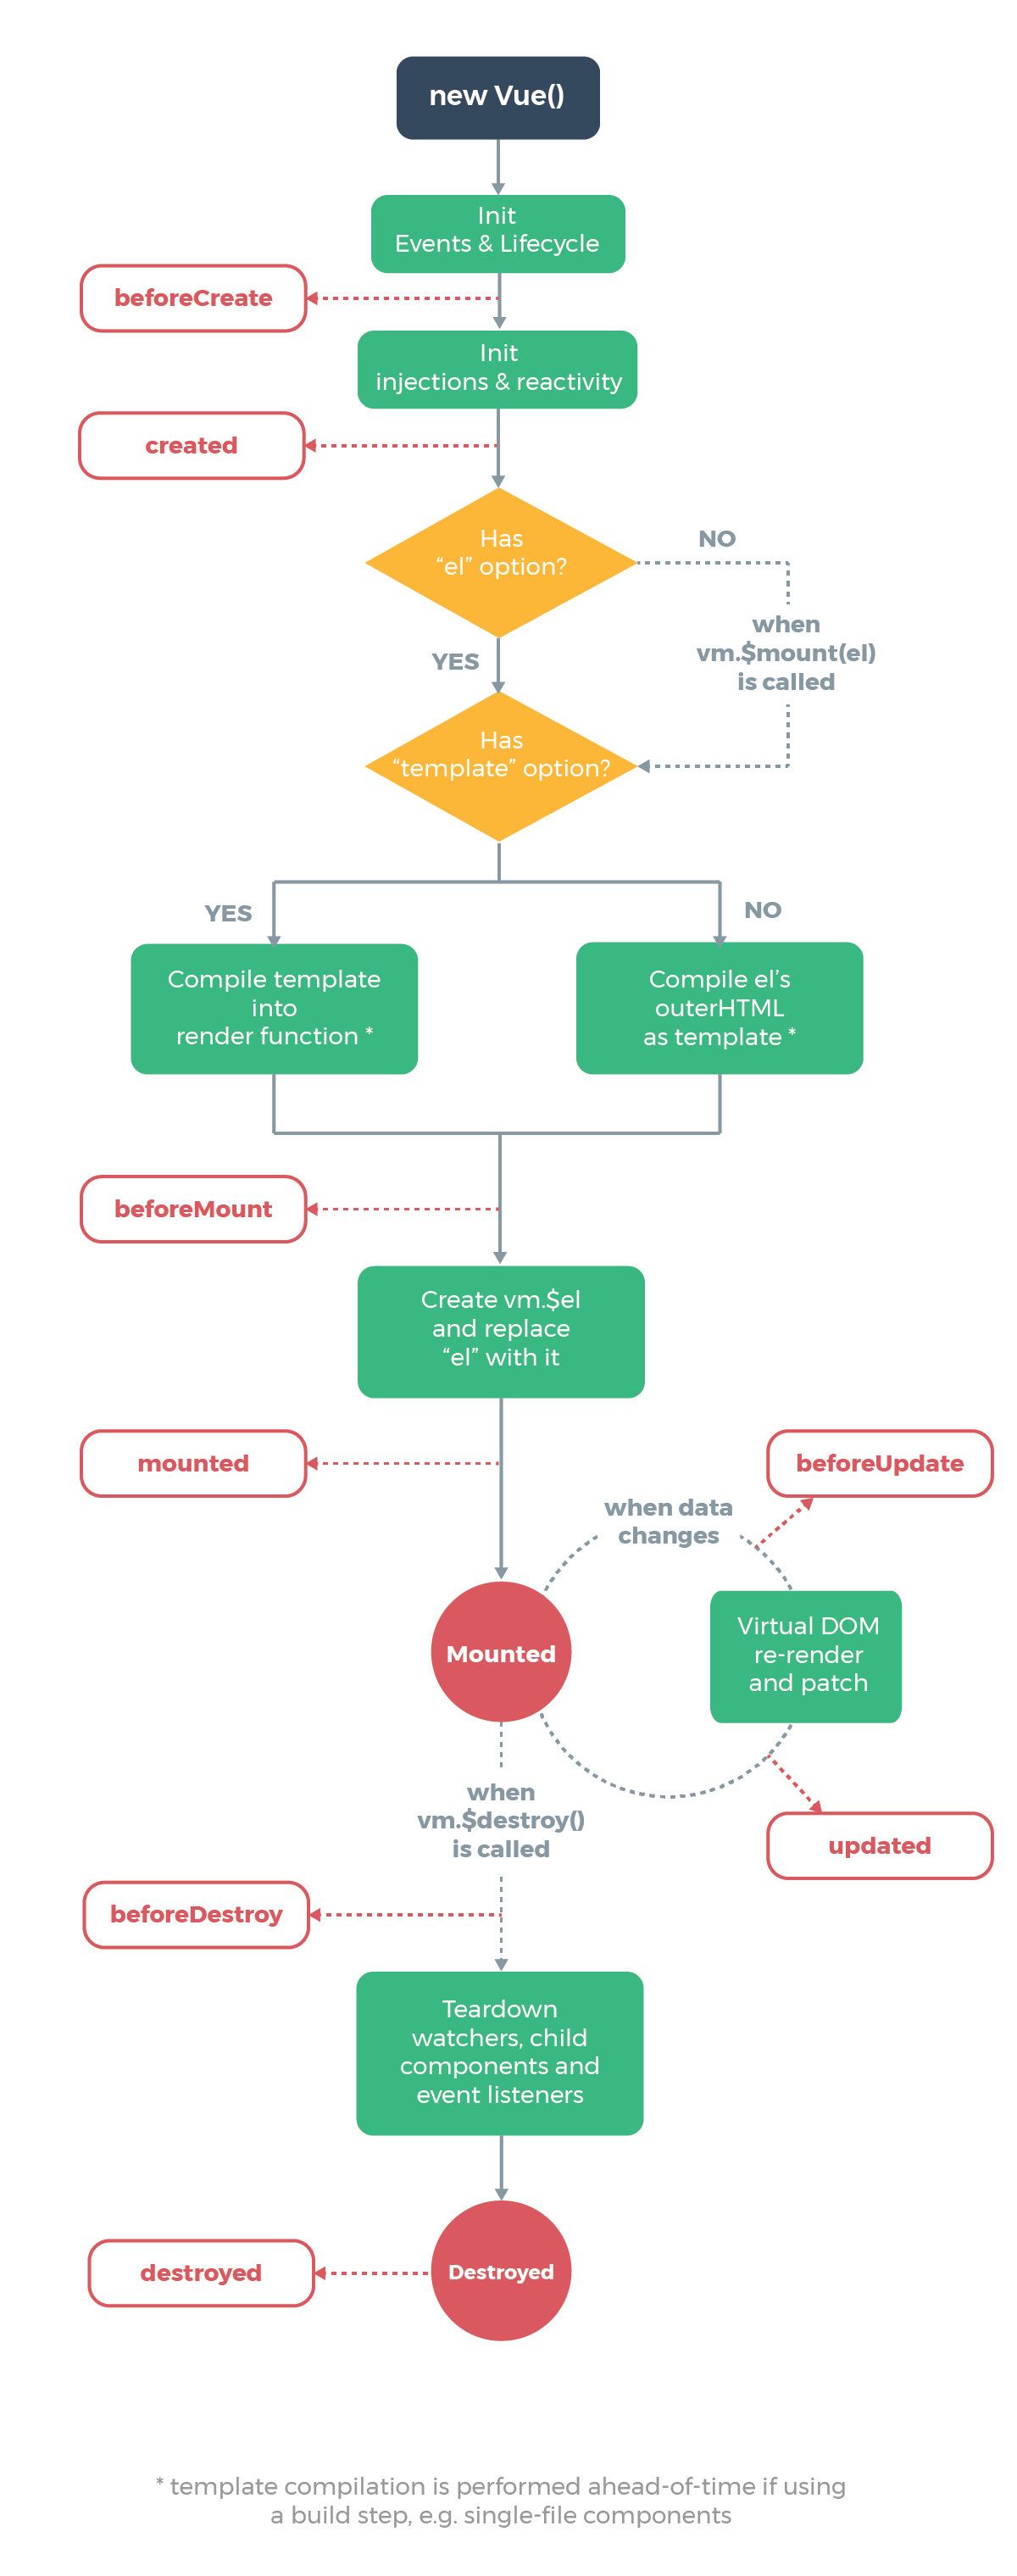
Lifecycle Hooks은 크게 created, mounted, updated, destroyed 4단계로 나눌 수 있다.
세부적으로는 beforeCreate, created, beforeMount, mounted, beforeUpdate, updated, beforeDestroye, destroyed 8단계로 나눌 수 있다.
Lifecycle Hooks 단계별
Creation : 생성 단계
이 단계는 component가 Dom에 가장 처음으로 추가되기 전 이다.
생성 단계는 Lifecycle Hooks에서 beforeCreate, created가 해당 된다.
beforeCreate
Lifecycle Hooks에서 제일 처음 실행되는 Hook 이다.
component의 data, events, computed, methods, watcher 가 정의되지 않은 시점으로 beforeCreate Hook에서 사용할 수 없으며, 사용 시 에러가 발생 된다.
또한, component가 Dom에 부착되기 전 단계라서 Dom을 조작할 수 없다.
<template>
	<h1>{{ name }}</h1>
</template>

<script>
export default {
  data() {
    return {
      name: 'superpil'
    }
  },
  beforeCreate() {
    console.log(name); // undefined
  }
}
</script>
👉 console.log(name)
- data에 name변수에 지정된 값을 읽을 수 없어 undefined가 출력 된다.
- data뿐만 아니라 events, methods 등이 정의 되지 않아 사용할 수 없다.
created
beforeCreate Hook 다음으로 실행되는 Hook이며, data, events, computed, methods, watcher 가 활성화 되어 사용가능 하다.
하지만 beforeCreate Hook과 마찮가지로 컴포넌트가 Dom에 부착되기 전 단계라서 Dom을 조작 할 수 없다
<template>
	<h1>{{ name }}</h1>
</template>

<script>
export default {
  data() {
    return {
      name: 'superpil'
    }
  },
  created() {
    console.log(name); // superpil
  }
}
</script>
👉 console.log(name)
- beforeCreate와 다르게 created Hook에서는 data가 활성화 되어 name이 정상적으로 출력 된다.
<template>
	<h1 ref="tag">{{ name }}</h1>
</template>

<script>
export default {
  data() {
    return {
      name: 'superpil'
    }
  },
  created() {
    console.log(this.$refs.tag); // undefined
  }
}
</script>
👉 console.log(this.$refs.tag)
- ref은 해당 Dom요소를 가져오는 속성이다. (가능한 ref를 사용하지 않는 것 이 좋다.)
- created Hook에서는 아직 Dom에 부착되지 않아 ref속성으로 해당 태그를 가져올 수 없다.
- 반면에 component를 Dom에 부착시키는 단계인 mounted에서는 ref속성으로 태그를 가져 올 수 있다.
Mounting : DOM 삽입 단계
component가 Dom에 부착 되는 단계이다. 초기 Dom을 변경하고 싶으면 Mounting단계에서 활용할 수 있다.
beforeMount
Dom에 부착되기 직전에 호출된다.
부착되기 직전이란 말은 Dom에 아직 부착 되지 않은 상태를 말한다.
<template>
  <div id="app">
    <h1 ref="tag">{{ name }}</h1>
  </div>
</template>

<script>

export default {
  data() {
    return {
      name: 'superpil'
    }
  },
  beforeMount(){
    console.log("before", this.$refs.tag); // undefined
  },
}
</script>
👉 console.log("before", this.$refs.tag)
- beforeMount는 Dom에 부착되기 직전이라 태그를 찾을 수 없다.
mounted
<template>
  <div id="app">
    <h1 ref="tag">{{ name }}</h1>
  </div>
</template>

<script>

export default {
  data() {
    return {
      name: 'superpil'
    }
  },
  mounted(){
    console.log("mounted", this.$refs.tag); // <h1>superpil</h1>
  },
}
</script>
👉 console.log("mounted", this.$refs.tag)
- 실제 Dom에 부착되고 난 이후에 실행되는 단계 이다.
- Dom을 접근 가능하며 직접 제어 가능하다.
Update : 재렌더링 단계
부착된 컴포넌트의 변화가 발생한 경우 감지하는 Hook다.
감지하는 변화 종류
- Dom태그 변화
- Dom태그 속성 변화
beforeUpdated
컴포넌트에서 사용되는 data의 값이 변해서 Dom에 변화가 적용되기 직전의 훅
updated
컴포넌트가 Dom에 부착된 이후 Dom의 변화가 발생한 경우 updated Hook에서 감지 한다.
<template>
	<h1>Component Main Page</h1>
	<p v-if="isShow">update</p>
	<button @click="show">버튼</button>
</template>

<script>
export default {
	data(){
		return{
			isShow: false,
		}
	},
	updated(){
		console.log("Dom변화 발생");
	},
	methods: {
		show(){
			this.isShow = !this.isShow;
		}
	},
}
</script>
👉 <p v-if="isShow">update</p>
- 처음 컴포넌트가 Dom에 출력될때 P태그는 v-if로 인해 Dom에 삽입되지 않는다.
- 버튼을 클릭하는 순간 P태그가 Dom에 삽입 된다.
- 이때, updated Hook이 감지하여 console.log("Dom변화 발생")가 실행된다.
Destruction : 소멸 단계
beforeDestroyed
컴포넌트 소멸되기 직전에 호출 되는 Hook며, 컴포넌트의 기능을 그대로 가지고 있는 상태 이다.
destroyed
컴포넌트의 소멸된 후에 호출 되는 Hook이며, beforeDestroyed와 다르게 컴포넌트의 기능(디렉티브, 이벤트, ETC)이 모두 해제된 상태 이다.
부모와 자식의 Lifecycle Hooks 과정
부모
<template>
  <div id="app">
		부모
    <Child></Child>
  </div>
</template>

<script>
import Child "./components/Child.vue";

export default {
  components:{
    Child,
  },
  created(){
    console.log('부모 created');
  },
  mounted(){
   console.log('부모 mounted');
  },
}
</script>
자식
<template>
<div>
자식
</div>
</template>
<script>
export default {
created(){
console.log('자식 created');
},
mounted(){
console.log('자식 mounted');
},
}
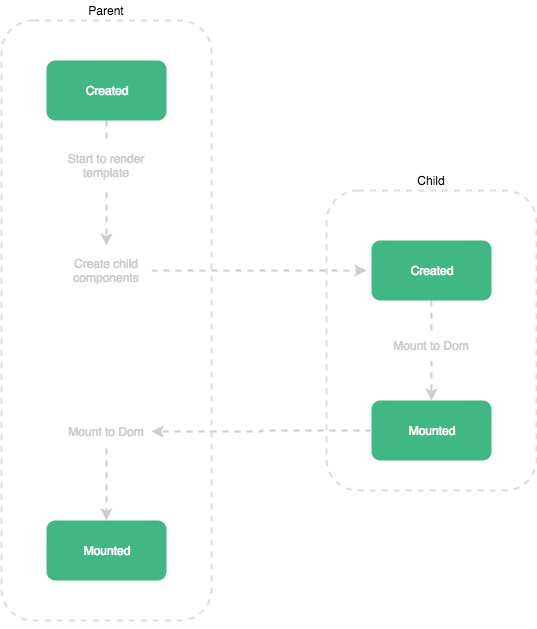
</script>👉 부모, 자식 호출 순서
- 부모 created → 자식 created → 자식 mounted → 부모 mounted
- 부모의 created, mounted가 먼저 호출 되고 자식 created, mounted가 호출 될 것 같지만, 부모 created 호출 된 후 자식 created, mounted가 호출 된다.
Reference
- https://www.notion.so/Lifecycle-Hooks-d32f28ce12934079bccb9ebf60d7956d#08bab2af9e7a4ea0a9bdcebc3785731a
- https://www.notion.so/Lifecycle-Hooks-d32f28ce12934079bccb9ebf60d7956d#69558e4cfac04337985585ebcccb46b2
'Dev.FrontEnd > Vue' 카테고리의 다른 글
| [Vue] input에 숫자만 입력 가능하게 하기 (1) | 2021.08.02 |
|---|---|
| [Vue] Naver 간편 로그인 (naverLogin_implicit-1.0.3.js) 구현 (2) | 2021.07.31 |
| [Vue] Watch (0) | 2021.07.21 |
| [Vue] class 동적 바인딩 (0) | 2020.11.04 |
| [Vue] 동적라우팅 route변화 감지 (0) | 2020.11.01 |


댓글