![[Spring Boot] Rest API 에 Spring Security Form 로그인 적용하기](https://img1.daumcdn.net/thumb/R750x0/?scode=mtistory2&fname=https%3A%2F%2Fblog.kakaocdn.net%2Fdn%2FpXGko%2FbtroWoYnOC2%2F5DyPUSEQ90XMEqkR8GArN1%2Fimg.png)

Rest Api개발 시 Spring Security를 Jwt token방식으로 사용해 왔었다.
token방식을 사용하게 되면 신경써야할 사항들이 생긴다.
그래서 Rest Api에 Spring Security Form방식으로 사용할 수 있는 방법을 공부 해보자!
환경 셋팅 및 프로젝트 생성
- Spring Boot 2.6.2
- Java 1.8
- Spring Security 5.6.1
- Mysql
- Mybatis
우선, 기본적인 Spring Boot 프로젝트를 생성한다.
이때 Spring Web, Spring Security, Lombok, DevTool, Mysql connector와 같이 기본적인 dependency와 함께 프로젝트를 만든다.
<dependencies>
    <dependency>
        <groupId>org.springframework.boot</groupId>
        <artifactId>spring-boot-starter-test</artifactId>
        <scope>test</scope>
    </dependency>
    <!-- web -->
    <dependency>
        <groupId>org.springframework.boot</groupId>
        <artifactId>spring-boot-starter-web</artifactId>
    </dependency>
    <!-- mybatis -->
    <dependency>
        <groupId>org.mybatis.spring.boot</groupId>
        <artifactId>mybatis-spring-boot-starter</artifactId>
        <version>2.1.4</version>
    </dependency>
    <!-- mysql -->
    <dependency>
        <groupId>mysql</groupId>
        <artifactId>mysql-connector-java</artifactId>
        <scope>runtime</scope>
    </dependency>
    <!-- devtools -->
    <dependency>
        <groupId>org.springframework.boot</groupId>
        <artifactId>spring-boot-devtools</artifactId>
        <scope>runtime</scope>
        <optional>true</optional>
    </dependency>
    <!-- lombok -->
    <dependency>
        <groupId>org.projectlombok</groupId>
        <artifactId>lombok</artifactId>
        <optional>true</optional>
    </dependency>
    <!-- security -->
    <dependency>
        <groupId>org.springframework.security</groupId>
        <artifactId>spring-security-test</artifactId>
        <scope>test</scope>
    </dependency>
    <dependency>
        <groupId>org.springframework.boot</groupId>
        <artifactId>spring-boot-starter-security</artifactId>
    </dependency>
</dependencies>
일단, Run Java
프로젝트 생성 시 Security dependency를 주입했기 때문에 Run Java로 프로젝트를 돌려보면 아래와 같이 login페이지로 자동으로 넘어간다.

현재 화면이 Spring Security가 기본으로 제공하는 웹 보안 인증(login)페이지고 Form방식이다.
(Form방식이니깐 당연히 데이터 타입을 form-data로 넘거야겠쥬!)
특별한 설정 없이는 모든 요청은 인증을 요구한다.
Rest Api로 개발 시 Form방식은 접어두고 Security Filter를 추가하여 JWT token방식으로 Security 인증처리를 했다.
하지만 이번에는 Security의 기본 Form방식을 사용해서 Rest Api를 만들어 보자.
매번 다르겠지만 SPA(Single Page Application)방식이 아닌 SSR(Server Side Rendering)로 개발 한다면 Form방식을 많이 사용하는 것 같다. 지극히 개인적인 의견!
JWT token방식은 상대적으로 설정이 많으며 로그아웃을 구현할 때 생각보다 token에 대해 신경써야 하는 문제가 많다. (가령, 로그아웃 후 JWT token의 유효기간이 남아있을 경우 해당 token으로 다시 로그인 요청했을 때 로그아웃 된 token인지 서버에서 어떻게 인식을 할 수 있는지 등등...)
이런 저런 이유로 Rest Api에서도 Form방식으로 인증처리가 된다면 개발자가 신경써야 되는 부분이 줄어들 것 같은 느낌적 느낌을 받는다!
우선 그렇게 하기 위해서는 Security에 설정과 custom해야되는 클래스들이 있다.
클래스 종류와 역할
앞으로 다양한 클래스가 나온다.
대부분 Spring Security에서 제공하는 클래스를 extends하거나 implements해서 custom하기 위한 클래스다.
클래스와 종류와 역할은 아래와 같다.
- SecurityConfig
WebSecurityConfigurerAdapter를 extends받아 Spring Security 설정 역할을 담당하는 핵심 클래스다. Spring Security의 모든 설정은 현재 클래스에서 한다고 해도 무방하다. - CustomLoadUserByUsername
UserDetailsService를 implements받아 실질적으로 회원정보를 조회하는 역할을 한다. - CustomAuthenticationSuccessHandler
AuthenticationSuccessHandler를 implements받아 로그인 성공 시 핸들링하는 역할을 한다. - CustomAuthenticationFailureHandler
AuthenticationFailureHandler를 implements받아 로그인 실패 시 핸들링하는 역할을 한다. - CustomAuthenticationProvider
AuthenticationProvider를 implements받아 인증처리 역할을 하는 핵심 클래스다. - BcryptPasswordEncoder
패스워드를 검증하는 메소드가 담긴 클래스다. 예제에서 BCryptPasswordEncoder해시 알고리즘을 사용한다. - HomeController
일반적인 Rest Api의 Controller 클래스다. - UserDto
UserDetails를 implements받아 회원정보를 담는 클래스다. - UserRepository
Mapper와 연결하는 일반적인 Repository 클래스다.
클래스로 알아보는 전체 흐름

- 클라이언트에게 요청이 들어오면 CustomAuthenticationProvider로 인증요청을 한다.
- CustomAuthenticationProvider는 CustomLoadUserByUsername에게 loginId(Security기본은 username이지만 예제에서 custom함)을 값을 넘긴다.
- CustomLoadUserByUsername는 전달받은 loginId로 UserRepository한테 요청해서 DB에 있는 회원 정보를 조회하라고 요청한다.
- 조회 시 회원정보가 없다면 CustomAuthenticationFailureHandle로 진입하고 리다이렉트 주소(/login/fail)와 함께 클라이언트에게 응답한다.
- (실패) 응답 받은 클라이언트는 리다이렉트 주소(/login/fail)로 재요청을 하고 응답값을 받는다.
- 조회 시 회원정보가 있다면 CustomAuthenticationProvider로 회원정보를 리턴해주고 패스워드 검증에 들어간다. 만약, 패스워드 검증에서 실패할 경우 5번과 동일한 프로세스를 탄다.
- 패스워드 검증에 성공한 경우 CustomAuthenticationSuccessHandler로 진입하고 리다이렉트 주소(/login/success)와 함께 클라이언트에게 응답한다.
- (성공) 응답 받은 클라이언트는 리다이렉트 주소(/login/success)로 재요청을 하고 응답값을 받는다.
예제 최종 패키지 구조
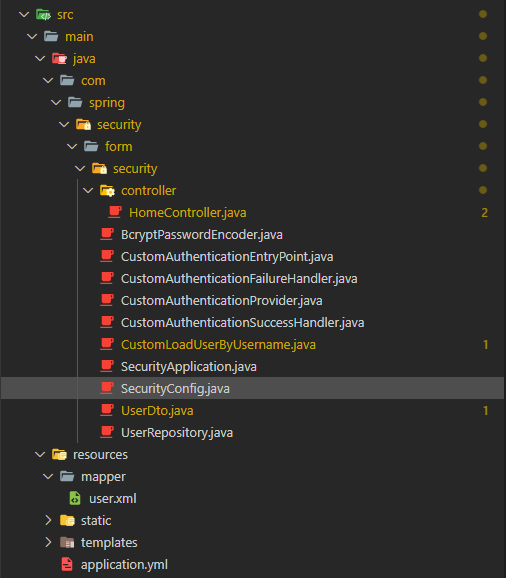
우선 예제 최종 패키지 구조를 보자.
딱히 패키지를 구분하지 않았다. (절어얼대 귀찮아서 구분하지 않음)
실제 프로젝트에서는 입맛에 맞게 패키지를 구분하면 된다.
Security 설정(SecurityConfig)
@Configuration
@EnableWebSecurity
public class SecurityConfig extends WebSecurityConfigurerAdapter {
}
Spring Security의 모든 설정을 할 수 있는 핵심 클래스다. 기본틀은 위 코드와 같다.
간단하게 기본틀에 대해 말하자면,
SecurityConfig 클래스를 만들고 WebSecurityConfigurerAdapter 클래스를 상속 받자.
WebSecurityConfigurerAdapter는 웹 보안 기능 초기화 및 설정하는 클래스다.
즉, WebSecurityConfigurerAdapter를 상속받아 Security기능을 확장하거나 변경해서 프로젝트에 맞는 인증, 인가 기능을 만들면 된다.
@EnableWebSecurity를 선언해서 지금 설정하는 Security 옵션을 활성화 시킨다.
package com.spring.security.form.security;

import org.springframework.beans.factory.annotation.Autowired;
import org.springframework.context.annotation.Configuration;
import org.springframework.security.config.annotation.authentication.builders.AuthenticationManagerBuilder;
import org.springframework.security.config.annotation.web.builders.HttpSecurity;
import org.springframework.security.config.annotation.web.configuration.EnableWebSecurity;
import org.springframework.security.config.annotation.web.configuration.WebSecurityConfigurerAdapter;

@Configuration
@EnableWebSecurity
public class SecurityConfig extends WebSecurityConfigurerAdapter {

  @Autowired
  private CustomAuthenticationSuccessHandler customAuthenticationSuccessHandler;
  @Autowired
  private CustomAuthenticationFailureHandler customAuthenticationFailureHandler;
  @Autowired
  private CustomAuthenticationProvider customAuthenticationProvider;

  @Override
  protected void configure(HttpSecurity http) throws Exception {
    http
      .csrf().disable()
      ;

    http
      .authorizeRequests()
        .antMatchers("/api/user").hasAnyRole("USER")
        .anyRequest().permitAll()
            ;

    http
      .formLogin()
        .loginProcessingUrl("/api/login")
        .usernameParameter("loginId")
        .passwordParameter("password")
        .successHandler(customAuthenticationSuccessHandler)
        .failureHandler(customAuthenticationFailureHandler)
      ;

    http
      .sessionManagement()
        .maximumSessions(1)
        .maxSessionsPreventsLogin(true)
      ;
  }

  @Override
  protected void configure(AuthenticationManagerBuilder auth) throws Exception {
    auth.authenticationProvider(customAuthenticationProvider);
  }

}
👉 .csrf().disable()
- 만약 단순히 로그인 구현이 목적이라면
csrf().disable()하고 넘어가자. - csrf는 요청자가 의도치않게 서버에 공격하는 것을 방지하는 token 검증 옵션이다.
- get요청일 경우 csrf검증이 없지만 post, put, delete요청일 경우 csrf검증을 한다.
- Spring Security 인증(로그인)방식은 post요청을 해야되서 csrf검증이 하게된다. 이번 예제에서 disable해서 검증을 하지 않게 하자.
👉 .authorizeRequests()
- 경로에 권한, 인증 설정을 한다는 선언이다.
👉 .antMatchers("/api/user").hasAnyRole("USER")
- /api/user에 대한 요청은 USER권한을 가진 회원만 승인한다.
- 아래 예제에 나오지만 정상 로그인 후 UsernamePasswordAuthenticationToken객체에 회원권한 정보를 담을 때 “ROLE_” 반드시 붙어야 Security에서 인식한다.
- 즉, hasAnyRole(”USER”)라고 옵션에 설정했지만 “ROLE_USER”로 UsernamePasswordAuthenticationToken객체에 값을 담아야 한다.
👉 .anyRequest().permitAll()
- 모든 요청에 대해 인증을 요구 하지 않는다.
- 하지만
.antMatchers("/api/user").hasAnyRole("USER")같이 특정 경로에 대해서 권한 또는 인증 설정을 하면 설정한 경로는 Security가 권한, 인증을 확인하고 그 외 다른 경로는 확인 하지 않는다.
👉 .formLogin()
- Form로그인을 선언한다.
- 만약 token방식으로 인증처리를 한다면 disable을 해야된다.
👉 .loginProcessingUrl("/api/login")
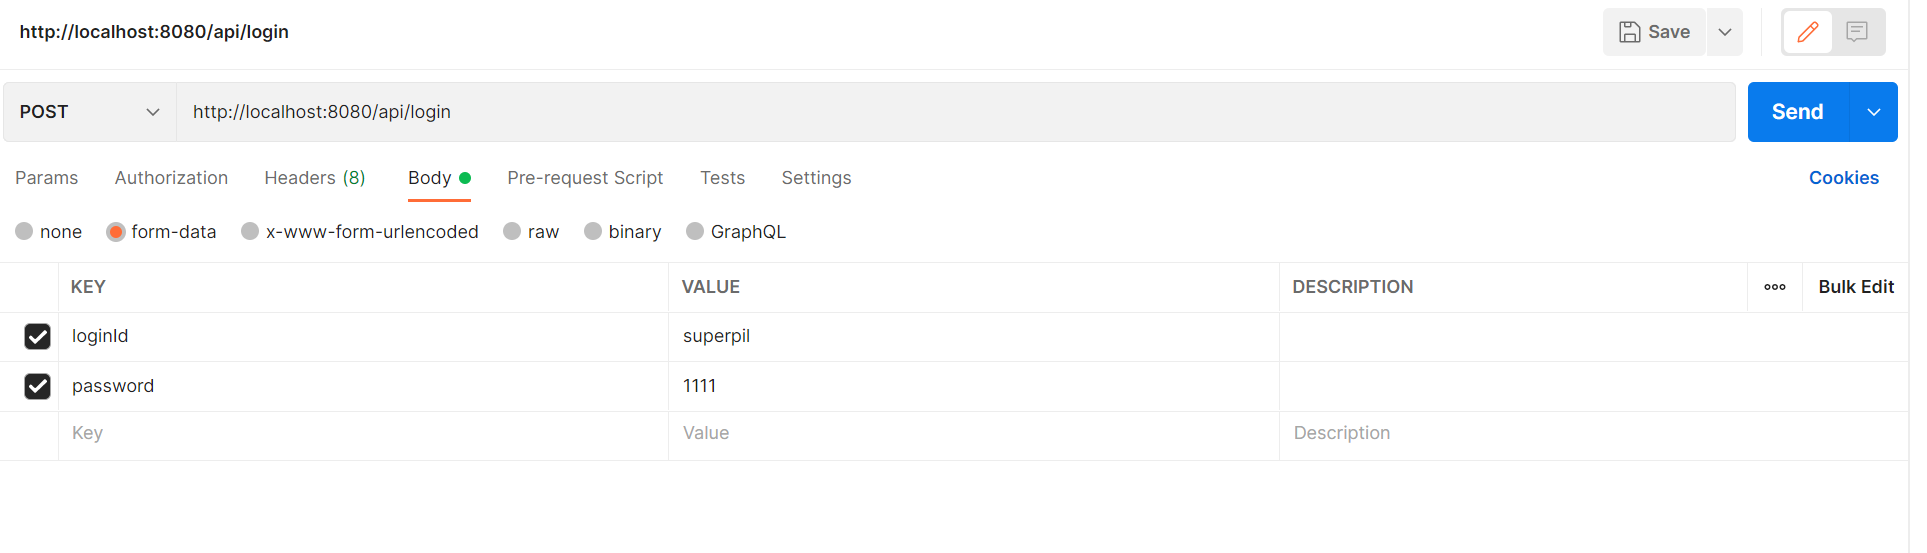
- Rest Api로 로그인 요청 URL 설정이다.
- 주의할점은 Rest Api에서 서버로 요청 시 대부분 json으로 데이터를 전송하지만 예제에서는 Form로그인을 사용하기 때문에 form-data으로 데이터를 전송해야 된다.
- 정리하면 http://localhost:8080/api/login로 form-data타입의 데이터를 전송하면 된다.
👉 .usernameParameter("loginId")
- Spring Security에서 기본으로 username과 password를 key값으로 검증한다.
- 기본 설정인 username으로 사용하고 싶으면 위 설정이 필요없지만 custom해서 사용하고 싶다면 원하는 값을 넣으면 된다.
- Api로 데이터 전송 시 username대신 loginId로 key을 작성해서 보내면 된다.
👉 .passwordParameter("password")
- username과 동일하다.
👉 .successHandler(customAuthenticationSuccessHandler)
- 로그인 인증이 성공 핸들링 설정이다.
- 예제에서는 클래스를 따로 분리하여 만들었다.
👉 .failureHandler(customAuthenticationFailureHandler)
- 로그인 인증이 실패 핸들링 설정이다.
👉 .maximumSessions(1)
- 최대 허용 가능 세션 수 설정이다.
- 1은 최대 로그인 허용가능한 개수는 1개라는 의미며 만약 2개면 로그인 허용개수가 2개가 된다.
- -1은 무제한 로그인 세션 허용이다.
👉 .maxSessionsPreventsLogin(true)
- 동시로그인 설정이다.
- true경우 동일한 계정으로 먼저 접근한 회원 있다면 두번째로 접근한 회원은 접근 불가능하게 한다.
- false는 true와 반대로 동일한 계정으로 먼저 접근한 회원이 있고 두번째 회원이 접근하면 첫번째 회원의 세션을 만료 시키고 두번째 회원의 세션을 정상 로그인으로 처리한다.
- default는 false이다.
👉 auth.authenticationProvider(customAuthenticationProvider)
- 로그인 요청시 인증 처리를 담당한다.
- customAuthenticationProvider에서 회원정보를 찾고 검증한다.
인증 성공 핸들링(customAuthenticationSuccessHandler)
package com.spring.security.form.security;

import java.io.IOException;

import javax.servlet.ServletException;
import javax.servlet.http.HttpServletRequest;
import javax.servlet.http.HttpServletResponse;
import javax.servlet.http.HttpSession;

import org.springframework.security.core.Authentication;
import org.springframework.security.web.authentication.AuthenticationSuccessHandler;
import org.springframework.stereotype.Component;

import lombok.extern.slf4j.Slf4j;

@Slf4j
@Component
public class CustomAuthenticationSuccessHandler implements AuthenticationSuccessHandler {

  @Override
    public void onAuthenticationSuccess(HttpServletRequest request, HttpServletResponse response, Authentication authentication) throws IOException, ServletException {
        HttpSession session = request.getSession();
        session.setMaxInactiveInterval(60);
        response.sendRedirect("http://localhost:8080/api/login/success");
    }

}
로그인 인증 성공 후 핸들링하는 클래스다.
회원은 http://localhost:8080/api/login로 로그인 인증 요청을 하고 회원정보가 있고 패스워드가 맞다면 현재 클래스가 응답한다.
👉 session.setMaxInactiveInterval(60)
- session 최대 유효시간 설정이다.
- 단위는 초(sec)이며, 예제는 60초(1분)로 설정 했다.
- session 유효시간 안에 재요청이 오면 session시간은 자동으로 연장된다. (다시 60초 유효시간이 설정 된다.)
👉 response.sendRedirect("http://localhost:8080/api/login/success")
- 해당 경로로 리다이렉트 응답을 한다.
- 클라이언트는 응답을 받으면 http://localhost:8080/api/login/success로 한번 더 요청(리다이렉트 요청이라서 응답받은 클라이언트는 자동으로 서버로 요청함)을 한다.
- http://localhost:8080/api/login/success로직은 HomeController에서 확인 할 수 있다.
- 굳이 리다이렉트 하지 않아도 된다고 판단한다. 성공 시 처리는 프로젝트에 맞게 로직을 구상하면 되겠다.
인증 실패 핸들링(customAuthenticationFailureHandler)
package com.spring.security.form.security;

import java.io.IOException;

import javax.servlet.ServletException;
import javax.servlet.http.HttpServletRequest;
import javax.servlet.http.HttpServletResponse;

import org.springframework.security.core.AuthenticationException;
import org.springframework.security.web.authentication.AuthenticationFailureHandler;
import org.springframework.stereotype.Component;

import lombok.extern.slf4j.Slf4j;

@Slf4j
@Component
public class CustomAuthenticationFailureHandler implements AuthenticationFailureHandler {

  @Override
    public void onAuthenticationFailure(HttpServletRequest request, HttpServletResponse response, AuthenticationException exception) throws IOException, ServletException {
        response.sendRedirect("http://localhost:8080/api/login/fail");
    }

}
👉 response.sendRedirect("http://localhost:8080/api/login/fail")
- 로그인 인증 성공과 동일한 처리다.
- 주의할점은 SecurityConfig클래스에서 .anyRequest().permitAll()를 하지 않을경우 로그인 실패 시 인증 실패 핸들링 클래스(customAuthenticationFailureHandler)에 접근하지 못한다.
- 방법은 .anyRequest().permitAll()로 설정하거나 .antMatchers("/api/login/fail").permitAll()로 로그인 실패시 핸들링하는 경로만 풀어주면 된다.
로그인 인증 검증(CustomAuthenticationProvider)
package com.spring.security.form.security;

import org.springframework.beans.factory.annotation.Autowired;
import org.springframework.security.authentication.AuthenticationProvider;
import org.springframework.security.authentication.BadCredentialsException;
import org.springframework.security.authentication.UsernamePasswordAuthenticationToken;
import org.springframework.security.core.Authentication;
import org.springframework.security.crypto.password.PasswordEncoder;
import org.springframework.security.core.AuthenticationException;
import org.springframework.stereotype.Component;

import lombok.extern.slf4j.Slf4j;

@Slf4j
@Component
public class CustomAuthenticationProvider implements AuthenticationProvider {

  @Autowired
  private CustomLoadUserByUsername customLoadUserByUsername;
  @Autowired
    private PasswordEncoder passwordEncoder;

  @Override
    public Authentication authenticate(Authentication authentication) throws AuthenticationException {
    UserDto user = (UserDto) customLoadUserByUsername.loadUserByUsername(authentication.getName().toString());

    String reqPassword = authentication.getCredentials().toString();
    if(!passwordEncoder.matches(reqPassword, user.getPassword())) throw new BadCredentialsException("Not Found User");

    return new UsernamePasswordAuthenticationToken(user, null, user.getAuthorities());
  }

  @Override
  public boolean supports(Class<?> authentication) {
    return true;
  }

}
👉 public Authentication authenticate(Authentication authentication) { ... }
- form-data로 전송된 데이터로 회원을 조회하고 회원이 있다면 패스워드가 맞는지 검증하는 메소드다.
👉 UserDto user = (UserDto) customLoadUserByUsername.loadUserByUsername(authentication.getName().toString())
- loginId로 회원 정보를 조회한다.
- 파라미터 값은 String타입의 loginId만 넘길 수 있다.
- 자세한 내용은 customLoadUserByUsername객체에서 다룬다.
👉 !passwordEncoder.matches(reqPassword, user.getPassword())
- 회원 정보가 있다면 패스워드가 맞는지 비교한다.
- 패스워드가 맞지 않다면 예외를 리턴 한다.
👉 return new UsernamePasswordAuthenticationToken(user, null, user.getAuthorities())
- UsernamePasswordAuthenticationToken은 인증이 완료되면 SecurityContextHolder.getContext()에 등록되는 객체다.
- SecurityContextHolder는 세션저장소로써 인증된 정보를 담고 있고 이후 인증된 회원이 재요청시 회원 정보를 얻을 수 있다.
- 첫번째 인자는 회원객체, 두번째 인자는 회원패스워드, 세번째 인자는 권한정보를 의미한다.
- UserDto는 UserDetails를 implements했기 때문에 UsernamePasswordAuthenticationToken인자로 넘길 수 있다.
패스워드 인코더(BcryptPasswordEncoder)
package com.spring.security.form.security;

import org.springframework.context.annotation.Bean;
import org.springframework.context.annotation.Configuration;
import org.springframework.security.crypto.bcrypt.BCryptPasswordEncoder;
import org.springframework.security.crypto.password.PasswordEncoder;

@Configuration
public class BcryptPasswordEncoder {

  @Bean
    public PasswordEncoder getPasswordEncoder() {
        return new BCryptPasswordEncoder();
    }

}
패스워드 인코더 객체를 생성하는 역할을 담당하는 클래스다.
Spring Boot 2.6버전 이전에는 spring security config에 bean등록해도 상관 없었는데 2.6부터 security config에 등록하니 순환참조 에러가 발생 해서 클래스를 따로 빼서 등록한다.
실제 회원 정보 찾기(CustomLoadUserByUsername)
package com.spring.security.form.security;

import org.springframework.beans.factory.annotation.Autowired;
import org.springframework.security.core.userdetails.UserDetails;
import org.springframework.security.core.userdetails.UserDetailsService;
import org.springframework.security.core.userdetails.UsernameNotFoundException;
import org.springframework.stereotype.Component;

import lombok.extern.slf4j.Slf4j;

@Component
@Slf4j
public class CustomLoadUserByUsername implements UserDetailsService{

    @Autowired
    UserRepository userRepository;

  @Override
    public UserDetails loadUserByUsername(String loginId) throws UsernameNotFoundException {
        UserDto user = userRepository.getOne(loginId);
        if(user == null)     throw new UsernameNotFoundException("Not Found User");
        return user;
    }

}
👉 public UserDetails loadUserByUsername(String loginId) throws UsernameNotFoundException { ... }
- 실제 회원을 조회하는 역할을 하며 로그인Id(username)으로 조회하고 회원이 있다면 회원객체를 리턴 한다.
회원 객체(UserDto)
package com.spring.security.form.security;

import java.util.ArrayList;
import java.util.Collection;
import java.util.List;

import org.springframework.security.core.GrantedAuthority;
import org.springframework.security.core.authority.SimpleGrantedAuthority;
import org.springframework.security.core.userdetails.UserDetails;

import lombok.ToString;

@ToString
public class UserDto implements UserDetails {

  String ROLE_PREFIX = "ROLE_";

  private String id;
  private String role;
  private String loginId;
  private String password;

  @Override
  public Collection<? extends GrantedAuthority> getAuthorities() {
    List<GrantedAuthority> authorities = new ArrayList<GrantedAuthority>();
        authorities.add(new SimpleGrantedAuthority(ROLE_PREFIX + role));
        return authorities;
  }

  @Override
  public String getPassword() {
    return password;
  }

  @Override
  public String getUsername() {
    return id;
  }

  // 계정 만료 여부(true: 만료되지 않음, false: 만료됨)
  @Override
  public boolean isAccountNonExpired() {
    return false;
  }

  // 계정 잠금 여부(true: 계정잠금아님, false: 계정잠금상태)
  @Override
  public boolean isAccountNonLocked() {
    return false;
  }

  // 계정 패스워드 만료 여부(true: 만료되지 않음, false: 만료됨)
  @Override
  public boolean isCredentialsNonExpired() {
    return false;
  }

  // 계정 사용가능 여부(true: 사용가능, false: 사용불가능)
  @Override
  public boolean isEnabled() {
    return false;
  }

}
UserDto는 일반적인 DB에서 사용자 정보를 담게되는 Dto클래스다.
하지만 Spring Security에서 UserDetails객체를 사용하기 때문에 UserDto에서 UserDetails객체를 implements 해야된다.
즉, DB에서 회원정보를 찾고 UsernamePasswordAuthenticationToken객체에 회원 정보를 담기 위해서는 UserDetails를 implements해야 UsernamePasswordAuthenticationToken객체에 담을 수 있다.
👉 String ROLE_PREFIX = "ROLE_"
- Spring Security의 권한정보를 담을때 ROLE가 반드시 앞에 붙어야 한다.
- 즉, 예제에서 보면
.antMatchers("/api/test").hasAnyRole("USER")설정이 있는데, UsernamePasswordAuthenticationToken객체의 권한 정보에 “ROLE_USER”로 등록이 되어야 한다.
Spring Security/Spring Boot - How to set ROLES for users - ROLE_에 대한 자료
👉 public Collection<? extends GrantedAuthority> getAuthorities() { ... }
- UsernamePasswordAuthenticationToken객체에 권한정보를 담기 위한 메소드
👉 public String getUsername() { ... }
- 회원 정보를 찾을 때 사용되는 메소드며, 중복되는 값을 입력하면 2명 이상이 찾아질 수 있기 때문에 회원 id(프라이머리키) 중복되지 않는게 좋다.
Controller(HomeController)
package com.spring.security.form.security.controller;

import java.security.Principal;
import java.util.HashMap;
import java.util.Map;

import org.springframework.http.HttpStatus;
import org.springframework.http.ResponseEntity;
import org.springframework.web.bind.annotation.GetMapping;
import org.springframework.web.bind.annotation.RequestMapping;
import org.springframework.web.bind.annotation.RestController;

import lombok.extern.slf4j.Slf4j;

@RestController
@RequestMapping("/api")
@Slf4j
public class HomeController {

  @GetMapping("/login/success")
  public ResponseEntity notSesstion() {
    log.info("로그인 성공");
    Map<String,Object> map = new HashMap<>();
        map.put("result", 1);
    return new ResponseEntity(map, HttpStatus.OK);
  }

  @GetMapping("/login/fail")
  public ResponseEntity hello() {
    log.info("로그인 실패");
    Map<String,Object> map = new HashMap<>();
        map.put("result", 0);
    return new ResponseEntity(map, HttpStatus.OK);
  }

  @GetMapping("/user")
  public String test(Principal user) {
    return "user만 접근";
  }

}
👉 @GetMapping("/login/success")
- 로그인 성공시 customAuthenticationSuccessHandler객체에서 리다이렉트하는 경로이다.
👉 @GetMapping("/login/fail")
- 로그인 실패시 customAuthenticationFailureHandler객체에서 리다이렉트하는 경로이다.
👉 @GetMapping("/user")
- user권한을 가진 회원만 접근 가능한 경로이다.
- 권한에 대한 예제를 위해 간단하게 테스트로 만들었다.
Repository(UserRepository)
package com.spring.security.form.security;

import org.apache.ibatis.annotations.Mapper;

@Mapper
public interface UserRepository {

  public UserDto getOne(String loginId);

}
마지막으로 loginId로 DB에서 회원 정보를 조회하는 일반적인 Repository 클래스다.
이렇게 Rest Api에 Spring Security Form 로그인 방식의 예제는 끝이 났다.
실제 프로젝트에 사용하기에는 다소 손봐야 할 곳이 많을 것 이다.
하지만 이번 예제를 통해 Spring Security의 전체적인 흐름을 알고 상황에 맞게 수정, 추가 하면 충분히 프로젝트에 적용시킬 수 있다고 생각한다.
'개발노트 > Spring' 카테고리의 다른 글
| [디자인 패턴] Singleton Pattern (0) | 2022.03.27 |
|---|---|
| [Spring Boot] Jackson 기본 개념과 LocalDateTime변환 이슈 (0) | 2022.03.21 |
| [디자인 패턴] Observer Pattern (0) | 2022.03.13 |
| [Spring Boot] 파일 다운로드 - 서버에서 다운 (1) | 2021.08.16 |
| [Spring Boot] @Vaild Annotation - 유효성 검사 (0) | 2020.08.23 |
개발 기록
포스팅이 좋았다면 "좋아요❤️" 또는 "구독👍🏻" 해주세요!
![[Spring Boot] Jackson 기본 개념과 LocalDateTime변환 이슈](https://img1.daumcdn.net/thumb/R750x0/?scode=mtistory2&fname=https%3A%2F%2Fblog.kakaocdn.net%2Fdn%2Fx38mB%2FbtrwLhWQRUV%2FCB0NPHSVwR0Kkr31hPZA41%2Fimg.png)
![[디자인 패턴] Observer Pattern](https://img1.daumcdn.net/thumb/R750x0/?scode=mtistory2&fname=https%3A%2F%2Fblog.kakaocdn.net%2Fdn%2F3EoL4%2FbtrvKqIoh7I%2FgTmdZ1eVhuDo9Z9SLRsft1%2Fimg.png)
![[Spring Boot] 파일 다운로드 - 서버에서 다운](https://img1.daumcdn.net/thumb/R750x0/?scode=mtistory2&fname=https%3A%2F%2Fblog.kakaocdn.net%2Fdn%2FbrjzLW%2Fbtrb7ystOMu%2FbzRSVwXIgxEL8vIVX1Esq0%2Fimg.png)
![[Spring Boot] @Vaild Annotation - 유효성 검사](https://img1.daumcdn.net/thumb/R750x0/?scode=mtistory2&fname=https%3A%2F%2Fblog.kakaocdn.net%2Fdn%2FbWj6eW%2FbtrclHOs0Yf%2Fr6hAKpYKnH942iyfGCPiVk%2Fimg.png)